IntroductionAlmost all modern web pages uses many AJAX techniques. One of them is partial rendering - it allows user to rerender only part of a page instead of its full contents.
Main benefits are:
- less response size sent via network
- less time needed to show new page contents
- less application server load
- better user experience
Recently I was using partial rendering in JSF application with Ajax4JSF framework. To have wider perspecitve I was going to try another out of the box solution from lightweight stack like Spring MVC, Spring Javascript and Apache Tiles.
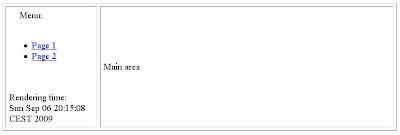
Application goalsTest application has a page layout configured with Tiles. Pages consist of menu on the left side and main contents on the right. Navigation links in menu are used to choose page contents for right side - it will be rerendered (Ajax) after each click on menu item.
Main page (rendering time is just to show ajax behaviour):
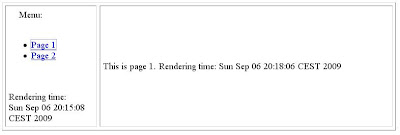
Page after ajax rerendering triggered by click in menu:
To prepare my sample application I used:
- Maven 2.0.9
- Java 1.6.0_12
- Spring 2.5.6
- Spring Javascript 2.0.5
- Apache Tiles 2.1.0
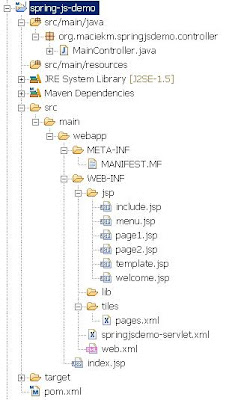
Project structure
I used typical maven structure for the project:
All project dependencies are configured in maven's pom.xml:
<project xmlns="http://maven.apache.org/POM/4.0.0" xmlns:xsi="http://www.w3.org/2001/XMLSchema-instance"
xsi:schemaLocation="http://maven.apache.org/POM/4.0.0 http://maven.apache.org/maven-v4_0_0.xsd">
<modelVersion>4.0.0</modelVersion>
<groupId>org.maciekm</groupId>
<artifactId>spring-js-demo</artifactId>
<packaging>war</packaging>
<version>1.0-SNAPSHOT</version>
<name>spring-js-demo Maven Webapp</name>
<url>http://maven.apache.org</url>
<dependencies>
  <dependency>
      <groupId>javax.servlet</groupId>
       <artifactId>servlet-api</artifactId>
      <version>2.4</version>
      <scope>provided</scope>
  </dependency>
  <dependency>
      <groupId>org.springframework</groupId>
      <artifactId>spring-webmvc</artifactId>
      <version>2.5.6</version>
  </dependency>
  <dependency>
      <groupId>org.springframework.webflow</groupId>
      <artifactId>org.springframework.js</artifactId>
      <version>2.0.5.RELEASE</version>
  </dependency>
  <dependency>
      <groupId>org.apache.tiles</groupId>
      <artifactId>tiles-core</artifactId>
      <version>2.1.0</version>
  </dependency>
  <dependency>
      <groupId>org.apache.tiles</groupId>
      <artifactId>tiles-jsp</artifactId>
      <version>2.1.0</version>
  </dependency>
  <dependency>
      <groupId>javax.servlet</groupId>
      <artifactId>jstl</artifactId>
      <version>1.0</version>
      <scope>provided</scope>
  </dependency>
  <dependency>
      <groupId>taglibs</groupId>
      <artifactId>standard</artifactId>
      <version>1.0</version>
      <scope>provided</scope>
  </dependency>
</dependencies>
<build>
  <finalName>spring-js-demo</finalName>
  <plugins>
      <plugin>
          <groupId>org.apache.maven.plugins</groupId>
          <artifactId>maven-compiler-plugin</artifactId>
       </plugin>
      <plugin>
          <groupId>org.mortbay.jetty</groupId>
          <artifactId>maven-jetty-plugin</artifactId>
       </plugin>
  </plugins>
</build>
</project>
Web application configurationAt first we need to configure our web app in web.xml:
<!DOCTYPE web-app PUBLIC
"-//Sun Microsystems, Inc.//DTD Web Application 2.3//EN"
"http://java.sun.com/dtd/web-app_2_3.dtd" >
<web-app>
    <display-name>Archetype Created Web Application</display-name>
    <filter>
        <filter-name>characterEncodingFilter</filter-name>
        <filter-class>org.springframework.web.filter.CharacterEncodingFilter</filter-class>
        <init-param>
            <param-name>encoding</param-name>
            <param-value>UTF-8</param-value>
        </init-param>
        <init-param>
            <param-name>forceEncoding</param-name>
            <param-value>true</param-value>
        </init-param>
    </filter>
    <servlet>
        <servlet-name>springjsdemo</servlet-name>
        <servlet-class>org.springframework.web.servlet.DispatcherServlet</servlet-class>
        <load-on-startup>1</load-on-startup>
    </servlet>
    <servlet>
        <servlet-name>Resource Servlet</servlet-name>
        <servlet-class>org.springframework.js.resource.ResourceServlet</servlet-class>
        <init-param>
            <param-name>allowedResourcePaths</param-name>
            <param-value>/**/*.css,/**/*.gif,/**/*.ico,/**/*.jpeg,/**/*.jpg,/**/*.js,/**/*.png,META-INF/**/*.css,META-INF/**/*.gif,META-INF/**/*.ico,META-INF/**/*.jpeg,META-INF/**/*.jpg,META-INF/**/*.js,META-INF/**/*.png,META-INF/**/dojo/resources/blank.html,/dojo/resources/blank.html</param-value>
        </init-param>
    </servlet>
    <servlet-mapping>
        <servlet-name>springjsdemo</servlet-name>
        <url-pattern>*.htm</url-pattern>
    </servlet-mapping>
    <servlet-mapping>
        <servlet-name>Resource Servlet</servlet-name>
        <url-pattern>/resources/*</url-pattern>
    </servlet-mapping>
</web-app>
Springjsdemo servlet is used to start spring web application context and as a front controller in our application.
Resources Servlet is necessary for Spring Javascript.
characterEncodingFilter is important when you want to use national characters on pages fragments rerendered by Ajax.
We also have to setup application context - springjsdemo-servlet.xml:
<?xml version="1.0" encoding="UTF-8"?>
<beans xmlns="http://www.springframework.org/schema/beans"
xmlns:xsi="http://www.w3.org/2001/XMLSchema-instance"
xmlns:context="http://www.springframework.org/schema/context"
xsi:schemaLocation="http://www.springframework.org/schema/beans
http://www.springframework.org/schema/beans/spring-beans-2.5.xsd
http://www.springframework.org/schema/context http://www.springframework.org/schema/context/spring-context-2.5.xsd">

    <context:component-scan base-package="org.maciekm.springjsdemo"/>
    <bean id="tilesConfigurer" class="org.springframework.web.servlet.view.tiles2.TilesConfigurer">
        <property name="definitions">
            <list>
                <value>/WEB-INF/tiles/pages.xml</value>
            </list>
        </property>
    </bean>
    <bean id="tilesViewResolver" class="org.springframework.js.ajax.AjaxUrlBasedViewResolver">
        <property name="viewClass" value="org.springframework.js.ajax.tiles2.AjaxTilesView"/>
    </bean>
</beans>
We configured Spring MVC to work with Apache Tiles. Spring MVC controller will be found and initialized by component scanning.
Pages layoutTiles layouts are configured in pages.xml:
<?xml version="1.0" encoding="ISO-8859-1" ?>
<!DOCTYPE tiles-definitions PUBLIC
"-//Apache Software Foundation//DTD Tiles Configuration 2.1//EN"
"http://tiles.apache.org/dtds/tiles-config_2_1.dtd">
<tiles-definitions>
  <definition name="welcome" template="/WEB-INF/jsp/template.jsp">
      <put-attribute name="menu" value="/WEB-INF/jsp/menu.jsp"/>
      <put-attribute name="body" value="/WEB-INF/jsp/welcome.jsp"/>
  </definition>
  <definition name="page1" extends="welcome">
      <put-attribute name="body" value="/WEB-INF/jsp/page1.jsp"/>
  </definition>
  <definition name="page2" extends="welcome">
      <put-attribute name="body" value="/WEB-INF/jsp/page2.jsp"/>
  </definition>
</tiles-definitions>
Idea of using Tiles is not just to define page layouts. It helps us to define logical structure of pages so we will be able to rerender its parts.
Our layout template is in template.jsp and we configured 3 views based on it:
welcome,
page1 and
page2. Each view consist of
menu and
body attributes.
Here we have template.jsp source:
<%@ page pageEncoding="UTF-8" %>
<%@ include file="include.jsp" %>
<html>
<head>
  <title>Spring JS Demo</title>
   <meta http-equiv="Content-Type" content="text/html; charset=utf-8" >
  <META HTTP-EQUIV="Pragma" CONTENT="no-cache">
  <META HTTP-EQUIV="Expires" CONTENT="-1">
  <meta http-equiv="Content-Language" content="pl">
  <meta http-equiv="Cache-Control" content="no-store, no-cache, must-revalidate, Post-Check=0, Pre-Check=0">
  <script type="text/javascript" src="<c:url value="/resources/dojo/dojo.js" />"> </script>
  <script type="text/javascript" src="<c:url value="/resources/spring/Spring.js" />"> </script>
  <script type="text/javascript" src="<c:url value="/resources/spring/Spring-Dojo.js" />"> </script>
</head>
<body>
  <table cellpadding="5" cellspacing="5" border="1" width="100%">
      <tr>
          <td id="left" width="150px"><tiles:insertAttribute name="menu" /></td>
          <td id="right"><tiles:insertAttribute name="body" /></td>
      </tr>
  </table>
</body>
</html>
JS files needed for Spring Javascript have been included.
Web pagesThe core point of our application is menu. It contains links that will allow you to choose body of the web page and rerender it using Ajax.
<%@ page pageEncoding="UTF-8" %>
<%@ include file="include.jsp" %>
Menu:
<br/>
<br/>
<ul>
<li>
<form action="<c:url value='/page1.htm'/>" method="POST" id="page1Form" style="padding: 0px;margin: 0px;"></form>
<a id="page1" href="#">Page 1</a>
</li>
<li>
<form action="<c:url value='/page2.htm'/>" method="POST" id="page2Form" style="padding: 0px;margin: 0px;"></form>
<a id="page2" href="#">Page 2</a>
</li>
</ul>
<script type="text/javascript">
Spring.addDecoration(new Spring.AjaxEventDecoration({
elementId: "page1",
formId: "page1Form",
event: "onclick",
params: {fragments: "body"}
}));
Spring.addDecoration(new Spring.AjaxEventDecoration({
elementId: "page2",
formId: "page2Form",
event: "onclick",
params: {fragments: "body"}
}));
</script>
<br/><br/>
Rendering time:<br/><%=new java.util.Date()%>
Each link is "decorated" with special Spring Javascript code.
AjaxEventDecoration will make Ajax request to server to ask for the page configured in form definition. However, it will ask only for specified page fragment -
body.
Name of this fragment must be the same as name of Tiles attribute in layout of requested page.
On both current page as well as loaded fragment we need to have a div element with ID same as fragment name -
body. Spring Javascript will be able to replace its old contents with new that just has been loaded from server.
Note: I used POST forms to define links becouse I had some problems with GET requests and cacheing in IE8. However it is not a recommended solution in a serious project. You should consider using GET with random parameters added just to avoid caching problem.
Default page body is defined in welcome.jsp as a part of
welcome tiles view:
<%@ page pageEncoding="UTF-8" %>
<%@ include file="include.jsp" %>
<div id="body">
    Main area
</div>
As I said, it contains
body div as an container for ajax rerendering with its initial value.
Below we have alternative pages that can be selected from menu.
page1.jsp:
<%@ page pageEncoding="UTF-8" %>
<%@ include file="include.jsp" %>
<div id="body">
    This is page 1. Rendering time: <%=new java.util.Date()%>
</div>
And page2.jsp:
<%@ page pageEncoding="UTF-8" %>
<%@ include file="include.jsp" %>
<div id="body">
    This is page 2. Rendering time: <%=new java.util.Date()%>
</div>
We need also some less important jsp pages to make our application running.
We use include.jsp just to include some TLDs:
<%@ page pageEncoding="UTF-8" %>
<%@ taglib uri="http://tiles.apache.org/tags-tiles" prefix="tiles" %>
<%@ taglib prefix="c" uri="http://java.sun.com/jstl/core" %>
<%@ taglib prefix="spring" uri="http://www.springframework.org/tags" %>
<%@ taglib prefix="form" uri="http://www.springframework.org/tags/form" %>
index.jsp is used only to redirect us from root view to our welcome page:
<%@ include file="/WEB-INF/jsp/include.jsp" %>
<c:redirect url="welcome.htm"/>
Spring MVC controllerOf course we need MVC controller to map our views to urls. It our simple case it does not contain any business logic.
We map:
- /welcome.htm -> welcome view
- /page1.htm -> page1 view
- /page2.html -> page2 view
Source code:
package org.maciekm.springjsdemo.controller;

import org.springframework.stereotype.Controller;
import org.springframework.web.bind.annotation.RequestMapping;

@Controller
public class MainController {

    @RequestMapping("/welcome.htm")
    public String welcomePage() {
        return "welcome";
    }

    @RequestMapping("/page1.htm")
    public String page1() {
        return "page1";
    }

    @RequestMapping("/page2.htm")
    public String page2() {
        return "page2";
    }
}
Running and testing
To run application type mvn jetty:run from console in main project directory. It should start Jetty server and deploy our webapp to http://localhost:8080/spring-js-demo. Point your browser to this url and test links in menu.
Hopefully our Ajax partial rendering works:)